


Using Github actions to deploy cloud functions
IMPORTANT - This article describres an old way of configuring github actions (this is what happens when using BETA products..). If you want to configure actions for your product, use the up-to-date docs on Github, I’ll try to update this article ASAP.
Since Github Actions has been introduced I’ve been excited about the possibilites for automating my coding workflow without mixing in some advanced CI system. It’s currently still in Beta, but the foundations of the system allow you to basically automate all aspects of your code while keeping this pipeline versioned and defined next to your code.
I’d like to share an example here that I find useful and helps me understand how exactly Github Actions is working. The introductionary text sounds pretty great, but I didn’t fully grasp how it was working until actually trying to implement some workflows myself.
Basics
So how exactly does it work? Github actions are stored on a per-repo basis in a *.workflow file. You can have multiple of these files in your repository because each of these files triggers on a different “event”. You can have workflows listening to branch updates, new pull requests, etcetera (full list of events). The docs do quite an ok job explaining the possibilities of Github Actions, but just to add my two cents to it, this is the core concept I missed when trying to make a workflow for my project:
Every repo needs to create their own workflow, these contain specific instructions! However, not everyone has to create custom Github Actions, this is usually only necessary in advanced use cases, e.g. you have specific requirements on OS + dependency combinations. The most common actions for web development are already available.
So what this comes down to, if you have a repository that just needs to run some npm command or some node.js based script, you can easily get this done by creating a single .workflow file, and you don’t have to jump through the hoops of creating a custom Github Action (detailed here).
With that being said, let’s try to make a simple workflow!
Automatically deploying cloud functions
For this example, what we basically want to do is automate the deployment of a cloud function (for the sake of this example, a Google Cloud function) if the master branch is being updated. Especially if your product relies on a lot of these cloud functions and you don’t want to deal with individual access rights for each developer in your team, it could be nice to automate deployment on github level and be done with it.
I’m going to assume you already have created a cloud function on Google Cloud that you can use to test this workflow with.
Files related to Github actions are stored inside the repo in the .github/* directory. You can edit them in your favorite code editor, but on Github there’s a visual editor as well which will show you the workflow using fancy boxes and arrows.
# main.workflow

workflow "Deploy to cloud function" {
  on = "push"
  resolves = ["Deploy to Google Cloud"]
}

# install with yarn
action "Install" {
  uses = "actions/npm@1.0.0"
  runs = "yarn"
  args = "install"
}

# build with yarn
action "Build" {
  needs = "Install"
  uses = "actions/npm@1.0.0"
  runs = "yarn"
  args = "build"
}

action "Setup Google Cloud" {
  uses = "actions/gcloud/auth@master"
  secrets = ["GCLOUD_AUTH"]
}

# Deploy Filter, only deploy on master branch
action "Deploy branch filter" {
  needs = ["Build", "Setup Google Cloud"]
  uses = "actions/bin/filter@master"
  args = "branch master"
}

# Deploy
action "Deploy to Google Cloud" {
  uses = "actions/gcloud/cli@master"
  needs = ["Deploy branch filter"]
  runs = "sh -c"
  args = ["gcloud functions deploy $CLOUD_FUNCTION --region=europe-west1 --source=. --trigger-http --project $CLOUD_PROJECT"]
  secrets = ["GCLOUD_AUTH"]
  env = {
    CLOUD_FUNCTION = <NAME_OF_YOUR_FUNCTION>
    CLOUD_PROJECT = <GCLOUD_PROJECT_NAME>
  }
}
Adding this file to your repository as .github/main.worflow and then opening it in github’s visual editor will look as follows:
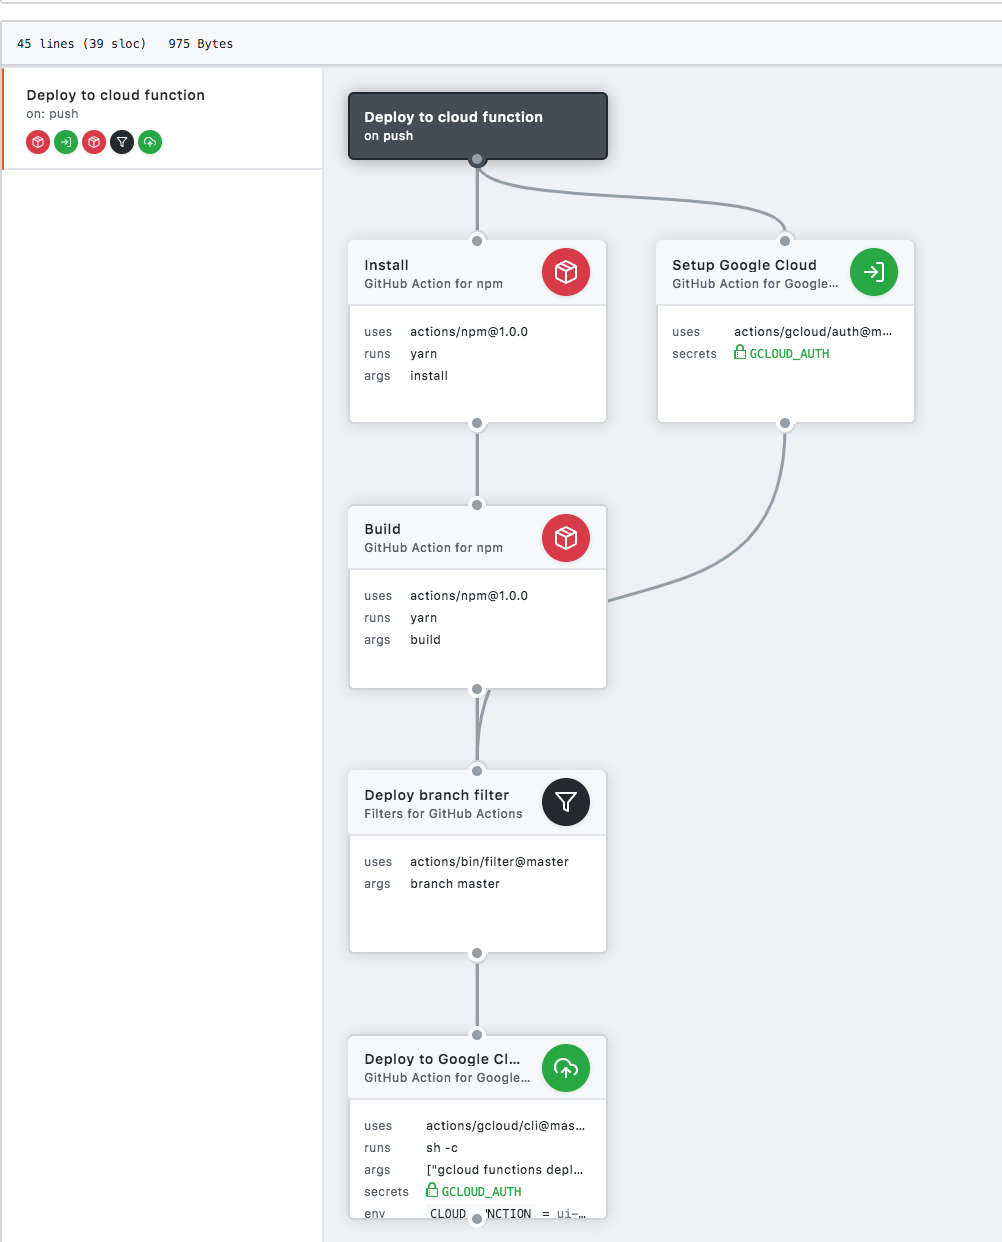
The benefit of this view is that it much more clearly shows how each step in the workflow relates to one another. For example, you can see that some individual “steps” can actually be run simultaneously in order to speed up the work that has to be done.
Configuration
From this view you can also see that some of the individual steps need additional configuration in the form of secrets or environment variables. Secrets are usually sensitive values like api tokens that you can one-off provide to a step, these are then encrypted and stored, so you can’t retrieve the value again. Environment variables you can update after creating and can be used to configure the behaviour of (reusable) actions. The same actually goes for the ‘args’ field.
Deploying to google cloud
The most interesting of these steps is the actual “deploy” action, let’s zoom in on this action. As can be seen from the diagram it requires the most additional information. The base of the step is a google-provided container, which basically means this is the “recommended way” of using the google cloud cli in github actions. Authentication is done by passing in the correct secrets and environment variables, you read that more clearly over here.
If that’s setup correclty, you can either run a shell script from your repo, or just paste a shell script in your args and call sh -c, which means something like, run the arguments as if it was a shell script.
So what are we running exactly?
gcloud functions deploy $CLOUD_FUNCTION --region=europe-west1 --source=. --trigger-http --project $CLOUD_PROJECT
Its the most basic version of the command to deploy a cloud function with name $CLOUD_FUNCTION in the current directory to project $CLOUD_PROJECT in region europe-west1 (this could be changed to an environment variable as well, but is hardcoded for the sake of this example).
Try it out!
To activate this workflow, the only thing you have to do is push a branch containing a workflow to github, or create a workflow on github using the visual editor! After doing this, you can follow any progress on Github actions from the “actions” tab, it will look more or less like so:
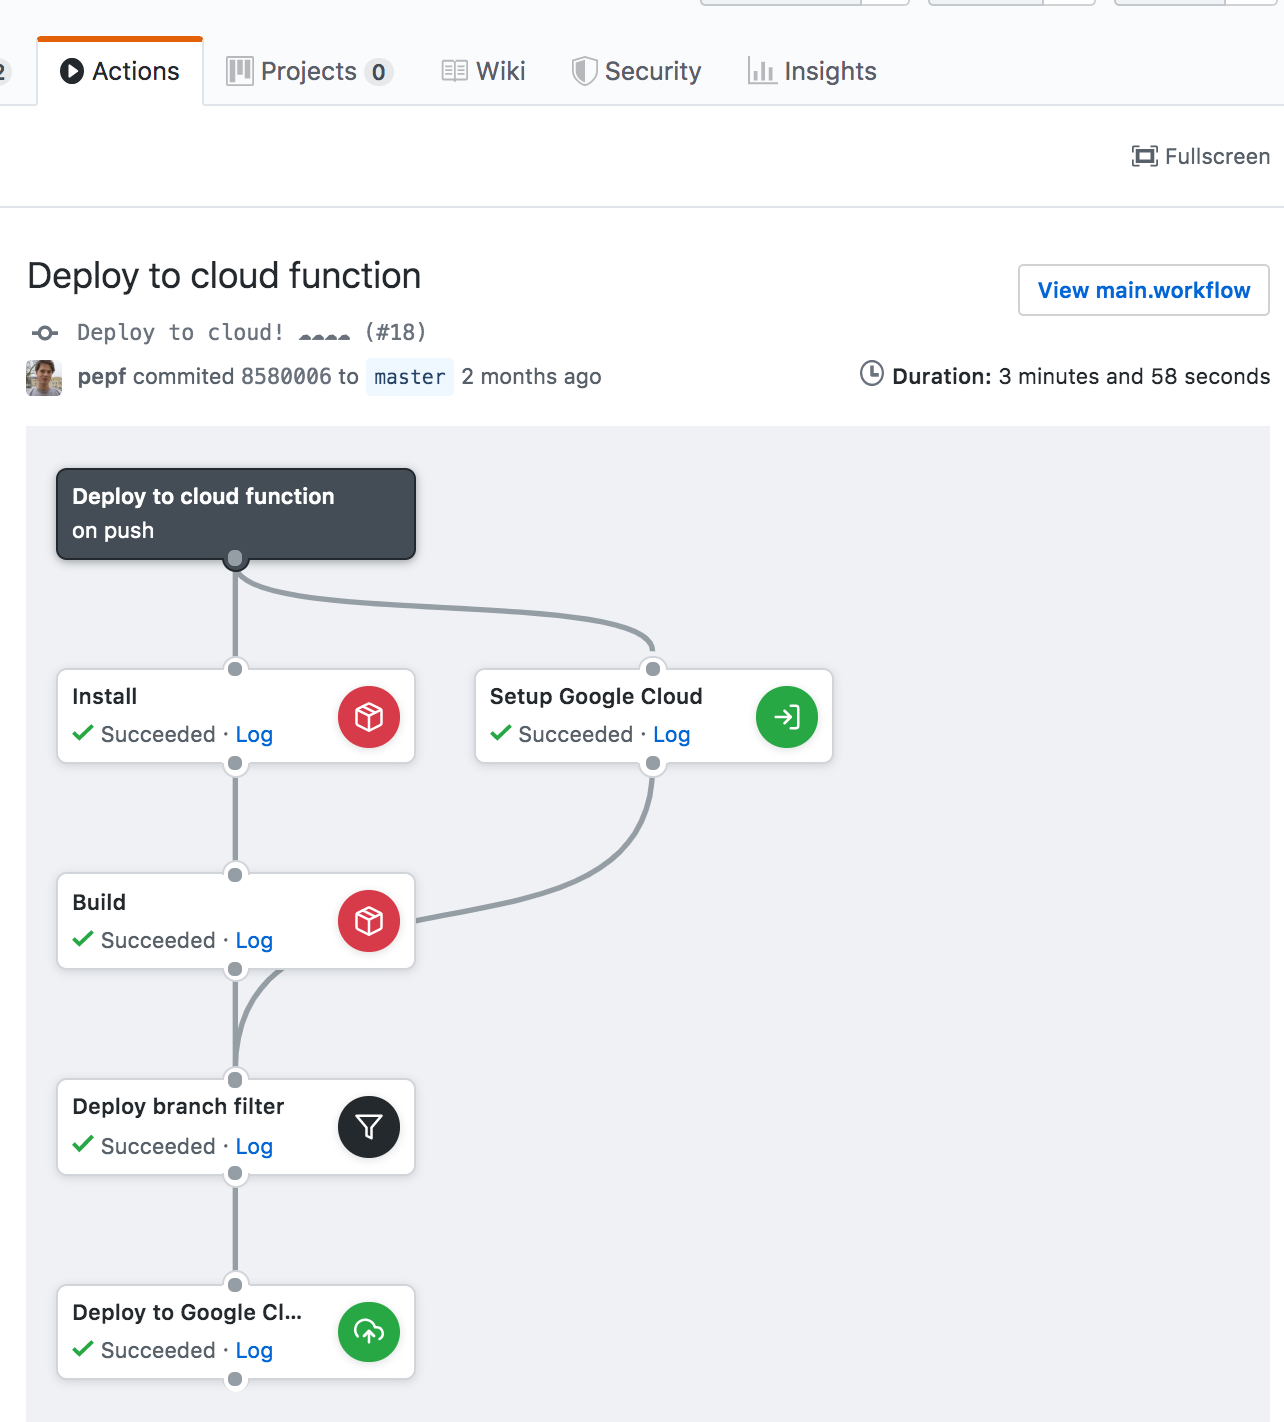
All our actions have been executed succesfully!
Further expansion
Of course unit tests and other checks can easily be implemented in this workflow! Extra yarn commands can be added by using the “actions/npm@1.0.0” container which whould probably cover most of the extra things you would want to achieve in a javascript-powered repository. A new action block can be added anywhere in the .workflow file, just make sure the ‘needs’ field is corectly pointing to it’s dependendant actions. Some ideas: * Run ‘yarn test’ before building, report test coverage back as a comment. * Create screenshots of your website and attach them to a pr for visual testing. * Report performance budgets for your code in the pr thread.
Some shortcomings
I’m not quite sure about the limits of the actions. The fact that one can do “pretty much everything” within these action blocks, it allows for quite some heavy computation. I don’t think the Actions system is intended for non-CI related computations though.
Currently Github specifies these limitations with regards to amount of actions:
Rate limits apply to individual workflows. The current rate limit is 20 workflow executions per minute. If you need to run larger builds, you can run an additional 15 workflow executions in the same minute window.
We’ll have to see how this evolves over time, but this seems like more than enough for an average repository.